Trik Mencuri Data dari FlashDisk


stealge

sumber gambar: http://gispro.files.wordpress.com/2007/09/stealge.jpg

Penggunaan flashdisk, saat ini, telah menjadi suatu barang yang sangat umum untuk digunakan. Baik untuk menyimpan file-file yang bersifat tidak penting hingga yang super penting.

Penggunaan flashdisk yang semakin umum ini, disebabkan oleh semakin murahnya harga sebuah flashdisk dan semakin besar kemampuan menyimpan data serta sifat mobilitasnya yang sangat tinggi.

Sifat yang terakhir tadi, mengakibatkan pemakaian flashdisk lebih beresiko. Apalagi menyimpan data-data penting dan rahasia.

Berikut cara-cara yang sering digunakan untuk mencuri data-data dari flashdisk.

Tool yang dibutuhkan:

Langkah-Langkah:

  1. Setelah anda mendownloadnya, copy thumbSUCK.exe ke dalam suatu directory. Misalnya saja anda letakkan di Local Drive D:\ dalam folder SKYRIDER. Kemudian klik 2x file ThumbSUCK.exe tadi untuk menjalankannya. Buatlah folder tersebut menjadi super hidden dengan menggunakan atribut SUPER HIDDEN pada CommandPrompt agar korban tidak curiga. Ikuti panduan berikut:
    • Klik Start >> Run lalu ketik cmd untuk memanggil Windows Command Processor
    • Masuk ke drive D dengan mengetikkan D: kemudian tekan ENTER
    • Untuk menjadikan folder tersebut menjadi super hidden, gunakan saja perintah attrib dengan format: attrib +s +h skyrider
  2. Hingga tahap ini Anda telah bisa untuk mengkopi semua data yang ada dalam flashdisk secara otomatis, bila ada flashdisk yang terhubung di komputer Anda. Semua file akan disalin oleh ThumbSUCK.exe secara sembunyi-sembunyi. File yang telah dicuri oleh ThumbSUCK.exe akan disimpan di sub-folder sesuai dengan nama/volume label flashdisk di dalam folder SKYRIDER tadi kita buat.
  3. Untuk melihat hasil curiannya, hilangkan atribut SUPERHIDDEN dari folder SKYRIDER. Cara:
    • Klik Start >> Run lalu ketik cmd
    • Ketik D: kemudian ENTER untuk masuk di drive D:
    • Ketik attrib -s -h skyrider kemudian tekan ENTER

Bila telah berhasil, maka Anda bisa membuka folder SKYRIDER tadi dan semua data yang telah disalin oleh ThumbSUCK.exe. Untuk mendisable ThumbSUCK.exe, anda bisa menggunakan Windows TaskManager CRT+ALT+DEL

ThumbSUCK.exe tadi bisa dijalankan secara otomatis pada saat komputer dinyalakan (proses StartUp).

Alternatif pertama, dengan meletakkan ThumbSuck.exe pada folder Startup dalam menu Start > All Programs.

Alternatif kedua yaitu dengan menambahkan registry pada HKLM\SOFTWARE\Microsoft\Windows\CurrentVersion\Run.

Caranya:

  • Pada Start >>Run kemudian ketik regedit
  • Klik HKEY_LOCAL_MACHINE >> Klik SOFTWARE Klik Microsoft Klik Windows Klik CurrentVersion Klik Run
  • Klik kanan New pilih String Value
  • Ketik SKYRIDER sebagai key yang baru
  • Klik kanan key yang baru dibuat SKYRIDER >> Modify isi value sama dengan lokasi ThumbSUCK.exe yaitu di D:\SKYRIDER\ThumbSuck.exe.
  • Restart komputer Anda. Program ThumbSUCK.exe akan dijalankan secara otomatis.

Selamat mencoba.

[ bulan ini ] [ arsip ]


Setting Firewall dengan Shorewall

diposting pada 22:55:33, 2009-02-25 diposting dari blog temen

Sekedar berbagi, implementasi menggunakan Centos 5 + Squid + Shorewall 4.2.6 Pastikan squid dah berjalan normal, nanti kita akan coba set transparent proxy dengan bantuan Shorewall.

Pastikan ip forwarding sudah diset enable, "net.ipv4.ip_forward = 1" (/etc/sysctl.conf)

Download paket shorewall di www.shorewall.net bisa pake wget atau apapun yang penting source shorewall kita peroleh. Paket utama yakni shorewall-common dan shorewall-perl

Karena saya menggunakan source maka gunakan perintah dibawah ini untuk extract paketnya :

tar -jxf shorewall-common-4.6.2.tar.bz2  
tar -jxf shorewall-perl-4.6.2.tar.bz2

dimasing-masing direktori hasil extract (folder shorewall-common-4.6.2 dan shorewall-perl-4.6.2) diatas, kita lakukan proses install dengan perintah (jangan lupa, masuk foldernya dulu):

./install.sh

Setelah terinstall, shorewall bisa kita set otomatis dijalankan pada saat Startup dengan melakukan editing /etc/shorewall/shorewall.conf dan rubah menjadi STARTUP_ENABLED=Yes.

Setelah, itu lakukan konfigurasi file-file shorewall :

1. /etc/shorewall/zone

#Zone Display Comments
fw firewall
net ipv4 #Internet
loc ipv4 #Local Networks
#LAST LINE – add your entries before this line – DO NOT REMOVE

2. /etc/shorewall/policy

#SOURCE ZONE DESTINATION ZONE POLICY LOGLEVEL LIMIT:BURST
fw net ACCEPT
loc net ACCEPT
net all DROP
all all REJECT
#LAST LINE – add your entries before this line – DO NOT REMOVE

3. /etc/shorewall/interface

#ZONE INTERFACE BROADCAST OPTIONS
net eth0 detect blacklist
loc eth1 detect
#LAST LINE – add your entries before this line – DO NOT REMOVE

4. /etc/shorewall/masq

#INTERFACE SUBNET ADDRESS (eth0 ke internet, eth1 ke LAN jadi silakan disesuaikan)
eth0 eth1
#LAST LINE – add your entries before this line – DO NOT REMOVE

5. /etc/shorewall/rules

# Rule dari local ke mesin

# Terima koneksi dari DNS ( Port DNS 53 )
ACCEPT loc fw tcp 53
ACCEPT loc fw udp 53

# Terima proxy squid( transparent proxy port 3128 )
ACCEPT loc fw tcp 3128
ACCEPT loc fw tcp 8080

# Terima Koneksi Web port 80
ACCEPT loc fw tcp 80

# Terima koneksi ftp
ACCEPT loc fw tcp 20
ACCEPT loc fw tcp 21

# Terima koneksi untuk SSH
ACCEPT loc fw tcp 22

# Rule dari internet ke mesin router/gateway (centos)

# Terima koneksi DNS
ACCEPT net fw tcp 53
ACCEPT net fw udp 53

# Terima koneksi SSH port 22
ACCEPT net fw tcp 22

# Terima koneksi web Port 80
ACCEPT net fw tcp 80

# Terima koneksi pop3, imap, smtp
ACCEPT net fw tcp 25,110,143
ACCEPT fw net tcp 25,110,143
ACCEPT loc fw tcp 25,110,143
ACCEPT loc net tcp 25,110,143

# Terima koneksi ping
ACCEPT loc fw icmp 8
ACCEPT net fw icmp 8
ACCEPT fw loc icmp 8
ACCEPT fw net icmp 8

# Redirect request port 80 (http) ke port 3128 (squid, Squid transparent proxy, jangan lupa di squid diaktifkan opsi transparent)
REDIRECT loc 3128 tcp 80

Start shorewall menggunakan perintah :

shorewall start atau /etc/init.d/shorewall start

Selamat mencoba ..

Sumber : internet+pengalaman :)

Transparent Proxy di Centos 5

diposting pada 09:53:35, 2007-08-24
diposting dari blog temen

Proxy menjadi alternatif yang banyak di gunakan oleh beberapa isp atau komunitas rt/rw net .. bahkan di lingkup perkantoran keberadaan proxy sangat sering kita temukan.

Selain untuk alasan menghemat bandwidth, ada juga yang di gunakan sebagai authentikasi untuk membatasi hak akses bagi penggunanya.

Dalam tutorial kali ini, saya hanya akan mambahas bagaimana cara membuat transparent proxy. Secara default, squid sebagai software proxy yang digunakan dalam tutorial ini bisa langsung di gunakan. Parameter utama yang secara default adalah port yang di gunakan squid yakni port 3128, sehingga bagi client yang ingin mengkases internet harus mengarahkan browsernya ke proxy tersebut. kalo di internet explorer -> Tools -> Internet Options - > Pilih Tab Connections -> Lan Settings -> Kemudian beri tanda centang pada Proxy Server untuk memasukan alamat proxy berikut portnya (biasanya berupa ip server gateway/proxy atau domain).

Kondisi tersebut masih tidak bermasalah apabila hanya 1 atau 2 komputer saja, tapi bayangkan kalo kita harus set setiap browser untuk komputer yang banyak, misalnya di lab, kantor .. pasti bukan ide yang bagus untuk lembur hanya setting browser aja ..

Untuk mengatasi hal itu, maka proxy mode transparent akan sangat membantu pekerjaan administrator jaringan dalam mendistribusikan koneksi internetnya ke komputer-komputer tersebut.

Instalasi

Dalam tutorial ini, saya menggunakan Centos 5.

Squid bisa di download di http://www.squid-cache.org/ bisa paket rpm bisa berupa source. Tapi pada dasarnya paket tersebut sudah ada pada CD Centos sehingga tidak perlu download lagi.

Instalasi paket RPM ( versi squid : squid-2.6.STABLE6-3.el5 )

# rpm -ivh paket_squid.rpm

Jalankan squid

# /etc/init.d/squid start
Start pertama kali squid akan cek beberpaa parameter termasuk folder cache yang akan digunakan, tapi set default tidak akan ada masalah

Melihat proses squid

# /etc/init.d/squid status
squid (pid xxxx) is running...

Konfigurasi

Transparent :

  1. Edit file konfigurasi squid ( /etc/squid/squid.conf)
    # vi /etc/squid/squid.conf
  2. Tambahkan "transparent" setelah "http_port 3128" sehingga menjadi "http_port 3128 transparent
    " (tekan tombol INSERT di keyboard 1 kali untuk mode editing, tandanya ada tulisan "-- INSERT --" di pojok kiri bawah)

Network Akses :

  1. Cari tulisan "our_networks" dengan cara tekan tanda "/" kemudian tulis "our_networks" (diluar mode editing, tekan tombol ESC untuk menghilangkan mode editing)
  2. Tambahkan network anda, misalnya our_networks 192.168.10.0/24 192.168.20.0/24 (dalam mode editing)
  3. Untuk menyimpan hasil perubahan, keluar dari mode editing kemudian tekan tombol ":wq" (w = write, q=quit)

Setelah konfigurasi selesai, lakukan proses reload pada squid supaya menjalankan konfigurasi yang sudah dilakukan dengan perintah :

# /etc/init.d/squid reload atau
# /etc/init.d/squid restart

Sampai disini, squid sudah menjadi transparent proxy. Supaya squid dijalankan pada sat start up, gunakan perintah :
# chkconfig squid on

Supaya semua request diarahkan ke proxy tersebut, maka kita harus memaksa semua request ke port 80 (web/http request) untuk di arahkan ke port 3128. kita bisa menggunakan iptables.

Pastikan iptables sudah terinstal :
# rpm -qa iptables
iptables-1.3.5-1.2.1 (hasil)

Apabila belum install paket tersebut, dengan peritah
# rpm -ivh paket_iptables.rpm

langkah terakhir tambahkan baris berikut di file /etc/rc/local

/sbin/iptables --table nat -A PREROUTING -s ip_network/subnet_mask -p tcp -m tcp --dport 80 -j REDIRECT --to-ports 3128

sehingga script tersebut akan di jalankan pada saat start up

Silakan coba browsing dari browser anda.

Selamat Mencoba!

Generic Host Process for Win32 Services Error

<a href=Windows" />Saat browsing dengan windows tiba-tiba saja muncul pesan Generic Host Process for Win32 Services Error . Lalu koneksi internet terputus dan hanya bisa kembali akses internet dengan merestart komputer. Tapi hal ini sangat menjengkelkan jika frekuensi error ini muncul terus. Dan tidak mungkin selalu merestart komputer, terus terang saja ini sungguh-sungguh menjengkelkan.

Menurut informasi yang ada di situsnya yang buat, error ini akan muncul di Windows Service Pack SP jka di dalam Windows Service Pack SP 2 tersebut sudah terdapat update untuk sekurity 873333 (MS05-012).

Aneh bukan, Service Pack malah membuat problem lainnya. Harusnya khan menyelesaikan masalah tanpa masalah. :)
Oke lah, yang penting problem bisa diselesaikan dan tak perlu restart komputer terus menerus. Solusi yang dianjurkan oleh Microsoft adalah kita harus download patch tersebut , langsung saja ke sini . Lalu tinggal pilih sistem operasi windows yang kamu miliki.

Tetapi jangan senang dulu setelah ming-install patch tersebut, karena masih perlu edit registry-nya agar supaya error tidak muncul lagi.

1. Tutup Port 445
- Buka Registry Editor. Lalu ke posisi
HKEY_LOCAL_MACHINE\System\CurrentControlSet\Servic es\NetBT\Parameters
kamu akan menemukan TransportBindName , semula berisi \Device\ . lalu edit dan kosongkan saja.

2. Tutup Port 135
Masih di registry editor , lalu ke posisi HKEY_LOCAL_MACHINE\Software\Microsoft\OLE

registry

anda akan menemukan EnableDCOM Semula berisi value Y. edit saja lalu ganti dengan N

Setelah itu restart komputer dan semoga error yang sama tidak muncul lagi.

Kabel Jaringan

Pada posting ini penulis membahas tentang kabel jaringan. Tetapi tidak semua macam kabel jaringan. Penulis hanya membahas tentang kabel jaringan yang sering didengar dengan nama Kabel UTP (Unshielded twisted pair ).Kabel UTP ada 2 jenis, yaitu:
> Striaght
> Cross

Kabel ini terdiri dari delapan warna;
* Putih Orange
* Orange
* Putih Hijau
* Hijau
* Putih Biru
* Biru
* Putih Coklat
* Coklat

Cara pemasangan kabel UTP pada RJ45 tidak bisa seenaknya saja. Kita harus mengikuti standar yang sudah ada. Diatas telah disebutkan jenis kabel UTP, sekarang mari kita lanjutkan dengan cara pemasangannya.
1. Kabel Striaght
Kabel Striaght befungsi untuk menghubungkan perangkat yang tidak sejenis ( ex: kom - hub ). Susunan warna pemasangan kabel ini pada umum ialah : Putih Orange, Orange, Putih Hijau, Biru, Putih Biru, Hijau, Putih Coklat, Coklat. Pada kedua ujung kabel ini kita pasang dengan susunan warna yang sama.
2. Kabel Cross
Sedangkan kabel Cross berfungsi untuk menghubungkan perangkat yang sejenis (ex: kom-kom). Susunan umum pemasangan kabel ( ujung a) ini dengan warna : Putih Hijau, Hijau, Putih Orange, Biru, Putih Biru, Orange, Putih Coklat, Coklat. dan ujung kabel satunya (ujung b ) susunan warnanya sama dengan yang straight.

Disadur dari Shidik di http://www.buyau.co.cc/2008/12/kabel-jaringan.html

RBT PKS 2009

Karena banyaknya permintaan informasi tentang aktivasi RBT (Ring Back Tone) PKS, Berikut kami lampirkan pilihan dan cara aktivasinya.


PK-Sejahtera Online: Karena banyaknya permintaan informasi tentang aktivasi RBT (Ring Back Tone) PKS, Berikut kami lampirkan pilihan dan cara aktivasinya. semoga bermanfaat.

RBT PKS 2009
dan Panduan Register Tiap Operator
Kode Telkomsel
No Judul RBT Artis TELKOMSEL
1 Delapan Ruhul Jadid 3670317
2 Delapanku Al Veoli 3670318
3 Nomer 8 Barakatak 3670319
4 Surak RRC 3670320
5 Harapan Masih Ada Shoutul Harokah 3670321

Kode INDOSAT
No Judul RBT Artist / Penyanyi I-Sat
1 Bangkitlah Negeriku versi PKS Shoutul Harokah 1903643
2 Generasi Baru Shoutul Harokah 1903644
3 Semua Pilih PKS Ababil Voice 1903645
4 PKS Tangtos Ababil Voice 1903647
5 IKLAN PKS versi GILABOLA Nugie Al-Afgani 1903642
6 IKLAN PKS versi SUSAH MILIH Nugie Al-Afgani 1903638
7 IKLAN PKS versi SI ENGKO Nugie Al-Afgani 1903637
8 IKLAN PKS versi SAGALA A Nugie Al-Afgani 1903639
9 IKLAN PKS versi PETANI Nugie Al-Afgani 1903641
10 IKLAN PKS versi MESRA Nugie Al-Afgani 1903640
11 Bangkitlah Indonesia Ali Audah 1300152
12 Harapan Masih Ada (Re-Mix) Shoutul Harokah 1903699

Kode XL
No Judul RBT Artist / Penyanyi XL
1 Bangkitlah Negeriku versi PKS Shoutul Harokah 12600811
2 Generasi Baru Shoutul Harokah 12600812
3 Surak PKS RRC 12600800
4 Pemilu Sudah Tiba Ebith Beat A 12600798
5 Semua Pilih PKS Ababil Voice 12600797
6 PKS Tangtos Ababil Voice 12600796
7 Hayu PKS Barakatak M-Prod 12600799
8 Nomer 8 Barakatak M-Prod 12600804
9 Pilih-Pilih PKS Tashiru 12600802
10 Delapanku Al-Veoli 12600802
11 PKS Anti Korupsi MUPLA 12600803
12 IKLAN PKS versi GILABOLA Nugie Al-Afgani 12600805
13 IKLAN PKS versi SUSAH MILIH Nugie Al-Afgani 12600810
15 IKLAN PKS versi SI ENGKO Nugie Al-Afgani 12600809
16 IKLAN PKS versi SAGALA A Nugie Al-Afgani 12600808
17 IKLAN PKS versi PETANI Nugie Al-Afgani 12600807
18 IKLAN PKS versi MESRA Nugie Al-Afgani 12600806
19 Delapan Ruhul Jadid 12600783
21 Sambutlah Ruhul Jadid 12600784
22 Bangkitlah Indonesia Husain Audah 12600636
23 Harapan Masih Ada (Re-Mix) Shoutul Harokah 10504721
24 Delapan Yang Kupilih (Re-Mix) Ruhul Jadid 10504717
25 Delapanku (Intro) Al-Veoli 10504718
26 Nomor Delapan (Intro) Barakatak M-Prod 10504719
27 Surak (Intro) RRC 10504720

Kode FLEXI
No Judul RBT Artist / Penyanyi FLEXI
1 Bangkitlah Negeriku versi PKS Shoutul Harokah 6752733
2 Surak PKS RRC 6752731
3 Generasi Baru Shoutul Harokah 6752734
4 Pemilu Sudah Tiba Ebith Beat A 6752728
5 Semua Pilih PKS Ababil Voice 6752725
6 PKS Tangtos Ababil Voice 6752724
7 Hayu PKS Barakatak M-Prod 6752727
8 Nomer 8 Barakatak M-Prod 6752732
9 Pilih-Pilih PKS Tashiru 6752729
10 Delapanku Al-Veoli 6752726
11 PKS Anti Korupsi MUPLA 6752730
13 Delapan (Semangat) Husain Audah 6712769
14 Sambutlah Ruhul Jadid 6712768
15 Bangkitlah Indonesia Husain Audah 6712740
16 Delapanku Al-Veoli 5670162
17 Delapan Ruhul Jadid 5670161
18 Nomer 8 Barakatak M-Prod 5670163
19 Surak PKS RRC 5670164

Kode Esia
No Judul RBT Artis ESIA
1 Delapan Ruhul Jadid 3670317
2 Delapanku Al Veoli 3670318
3 Nomer 8 Barakatak 3670319
4 Surak RRC 3670320
5 Harapan Masih Ada Shoutul Harokah 3670321

Kode AXIS
No Judul RBT Artis AXIS
1 Delapan Ruhul Jadid 3670317
2 Delapanku Al Veoli 3670318
3 Nomer 8 Barakatak 3670319
4 Surak RRC 3670320
5 Harapan Masih Ada Shoutul Harokah 3670321

Kode Ceria
No Judul RBT Artis CERIA
1 Delapan Ruhul Jadid 3670317
2 Delapanku Al Veoli 3670318
3 Nomer 8 Barakatak 3670319
4 Surak RRC 3670320
5 Harapan Masih Ada Shoutul Harokah 3670321

Kode Three
No Judul RBT Artis Thre/Hutchinson
1 Delapan Ruhul Jadid 3670317
2 Delapanku Al Veoli 3670318
3 Nomer 8 Barakatak 3670319
4 Surak RRC 3670320
5 Harapan Masih Ada Shoutul Harokah 3670321

Kode Mobile 8
No Judul RBT Artis M8
1 Delapan Ruhul Jadid 350197996
2 Delapanku Al Veoli 350198096
3 Nomer 8 Barakatak 350198196
4 Surak RRC 350198296
5 Harapan Masih Ada Shoutul Harokah 350198396


Panduan Register Tiap Operator
PANDUAN AKTIVASI Ring Back Tones
NSP 1212 - TELKOMSEL

Tarif kartuHALO * simPATI Kartu As
SMS ke nomor 1212 Rp 250 Rp 350 Rp 350
Telepon ke nomor 1212 Rp 500/ menit Rp 700/ menit Rp 700/ menit
Download Nada Sambung Pribadi Rp 9.000/lagu/30 hari Rp 9.900/lagu/30 hari Rp 9.900/lagu/30 hari
Renewal NSP Rp 7.500/lagu/30 hari Rp 8.250/lagu/30 hari Rp 8.250/lagu/30 hari
NSP Unik Rp 5.000/lagu/30 hari Rp 5.500/lagu/30 hari Rp 5.500/lagu/30 hari
NSP mingguan Rp 3.500/lagu/7 hari Rp 3.850/lagu/7 hari Rp 3.850/lagu/7 hari
* tarif belum termasuk pajak 10%

Anda dapat memiliki maksimal lima Nada Sambung Pribadi

Cara memilih Nada Sambung Pribadi sekaligus aktivasi:
- Melalui telepon ke nomor 1212 dan ikuti petunjuk
- Melalui WAP Telkomsel : http://wap.telkomsel.com melalui handset anda dan pilih nsp anda
- Melalui UMB melakukan panggilan ke *121# lalu ikuti petunjuk
- Melalui SMS:

1. Untuk menggunakan Nada Sambung Pribadi dalam interval waktu tertentu
Ketik: RING ON Kode Nada jam mulai jam selesai
Kirim ke: 1212
Contoh : RING ON 0110001 01 02 (nada sambung ini akan digunakan pada pukul 01 s.d 02)
catatan : waktu menyesuaikan wilayah yang ada di Indonesia

2. Untuk memberikan Nada Sambung Pribadi kepada orang lain
Ketik: RING GIFT Kode Nada No HP yang akan dikirimkan NSP
Kirim ke: 1212
Contoh : RING GIFT 0110001 0811102XXX

3. Untuk mengidentifikasikan Nada Sambuing Pribadi terhadap orang yang menelepon (NSP CLI)
Ketik: RING ON Kode Nada No HP yang diidentifikasikan dengan lagu tertentu
Kirim ke: 1212
Contoh : RING ON 0110001 0811102XXX

4. Otomatis memperpanjang Nada Sambung Pribadi yang dimiliki
Ketik: RING SUB Kode Nada
Kirim ke: 1212
Contoh : RING SUB 0110001

5. Memberhentikan layanan otomatis perpanjang NSP
Ketik: RING UNSUB Kode Nada
Kirim ke: 1212
Contoh : RING UNSUB 0110001

6. Mengaktifkan layanan NSP
Ketik: RING ON Kode Nada
Kirim ke: 1212
Contoh : RING ON 0110001

7. Mengetahui daftar NSP dari music box Anda
Ketik: RING LIST
Kirim ke: 1212
Contoh: RING LIST

8. Menampilkan list NSP dari MSISDN tertentu
Ketik: RING COPY MSISDN
Kirim ke: 1212
Contoh: RING COPY 081123XXXX

9. Memperpanjang Masa Berlaku NSP
Ketik: RING RENEW Kode Nada
Kirim ke: 1212
Contoh: RING RENEW 0110001

10. Mengetahui 5 lagu terfavorit
Ketik: RING TOP5
Kirim ke 1212
Contoh: RING TOP5

11. Menghapus NSP dari music box
Ketik: RING DEL Kode Nada
Kirim ke: 1212
Contoh : RING DEL 0110001

12. Mematikan NSP
Ketik: RING OFF
Kirim ke: 1212
Contoh : RING OFF

13. Bantuan
Ketik: RING HELP
Kirim ke: 1212
Contoh : RING HELP

14. Mencari berdasarkan judul lagu:
Ketik: CARI JUDUL keyword
Kirim ke: 1212
Contoh: CARI JUDUL Harapan Masih Ada

15. Mencari berdasarkan nama artis/penyanyi:
Ketik: CARI ARTIS keyword
Kirim ke: 1212
Contoh: CARI ARTIS Shoutul Harokah

16. Mencari berdasarkan nama composer/pencipta lagu
Ketik: CARI PENCIPTA keyword
Kirim ke: 1212
Contoh: CARI PENCIPTA Tate Qomarudin


sumber: www.telkomsel.com


PANDUAN AKTIVASI Ring Back Tones
I-RING 808 - INDOSAT

Tarif Mentari , IM3 & STAR ONE
DOWNLOAD Rp. 7.000,-/ bulan
GIFT Rp. 7.000,-/ hadiah yang kamu kirimkan ke temanmu
COPY Rp. 7.000,-/ satu kali meng-copy
TIME 1 Rp. 8.000,- / pilihan lagu (untuk original music)
TIME 2 Rp. 6.000,- / pilihan lagu (untuk sound effect)
DATE 1 Rp. 8.000,- / pilihan lagu (untuk original music)
DATE 2 Rp. 6.000,- / pilihan lagu (untuk sound effect)
(belum termasuk PPN 10%)

Pengaktifan layanan
Anda dapat mengaktifkan layanan i-Ring 808 dengan melalui WEB, WAP, SMS atau STK, atau dengan menghubungi Customer Service Mentari & Matrix 222, untuk IM3 300.
Untuk pengaktifan layanan pertama kali, akan memakan waktu proses selama 1 x 24 jam. Anda akan diberikan notifikasi via SMS jika layanan i-Ring 808 Anda telah aktif.

Mendownload i-Ring 808
Ketik : SET (KODE i-RING)
Kirim : 808

Melihat Status i-Ring 808
Ketik : STATUS
Kirim : 808

Via SMS
a. Untuk aktifkan layanan dasar:
Ketik SET kode_lagu kirim ke 808
Untuk me-nonaktifkan layanan ini :
Ketik STOP kirim ke 808
b. Aktivasi i-Ring 808
Ketik : REG
Kirim : 808
c. Menonaktifkan i-Ring 808
Ketik : STOP
Kirim : 808

Via WEB
Bagi Anda yang ingin mendapatkan layanan i-Ring 808 dapat memilih musik atau jenis suara yang diinginkan dengan meng-klik tombol download lagu pada web ( http://i-ring.matrix-centro.com , http://i-ring.klub-mentari.com , http://i-ring.m3-access.com ), dengan sebelumnya melakukan login. Lagu juga dapat diperdengarkan terlebih dahulu, sebelum melakukan download. [Anda akan menerima SMS konfirmasi dari sistem.]

Via WAP
Pada mobilephone Anda (yang sudah aktif layanan GPRS), ketiklah alamat http://i-ring.m3-access.com/wap (untuk pelanggan IM3) atau http://i-ring.klub-mentari.com/wap (untuk pelangganMentari) atau http://i-ring.matrix-centro.com/wap (untuk pelanggan Matrix). Ikutilah petunjuk selanjutnya untuk memilih lagu yang diinginkan.


FEATURES :

Mau kasih sesuatu yang special buat sahabatmu,
kasih hadiah lagu special dari nada sapa i-ring 808 Indosat.
Cara menggunakan:
Ketik: GIFTKodelagunomor telp temanmu
Kirim ke 808
Tarif:
Rp. 7.000,-/ hadiah yang kamu kirimkan ke temanmu
(harga belum termasuk PPN)

Pengen pakai nada sapa i-ring808 seperti nada sapa i-ring808 temen Indosat kamu,
copy aja lagu nya
Cara menggunakan:
Ketik: COPY nomor telp temanmu
Kirim ke 808
Tarif:
Rp. 7.000,-/ satu kali meng-copy lagu temanmu
(harga belum termasuk PPN)

Nada sapa di jam tertentu
Atur 3(tiga) nada sapa berdasarkan waktu sesuai keinginanmu dalam 1 (satu) hari
Cara Menggunakannya:
1. Pilihan waktu ke-1:
Ketik: TIME1jam awal-jam akhirkodelagu
2. Pilihan waktu ke-2:
Ketik: TIME2sam awal-jam akhirkodelagu
3. Pilihan waktu ke-3:
Ketik: TIME3jam awal-jam akhirkodelagu
Contoh: TIME 1 0712 060111299
Kode lagu yang dipilih akan berlaku pada waktu 1 yaitu mulai pukul 07 s/d 12 dan durasi waktu yang digunakan mulai pukul 00.00 s/d pukul 24.00
Lalu kirim ke 808 via SMS
Tarif :
Rp. 8.000,- / pilihan lagu (untuk original music)
Rp. 6.000,- / pilihan lagu (untuk sound effect)
(belum termasuk PPN 10%)

Nada sapa di hari special
Atur 3(tiga) hari specialmu dengan 3(tiga) jenis
nada sapa.
Cara Menggunakannya:
1. Setting tanggal ke-1:
Ketik: DATE1bln tglkodelagu
2. Setting tanggal ke-2:
Ketik: DATE2bln tglkodelagu
3. Setting tanggal ke-3:
Ketik: DATE3bln tglkodelagu
Contoh: DATE 1 0301 060111299
Kode lagu yang dipilih akan berlaku pada tanggal 1 Maret, penggunaan tanggal dan bulan menggunakan dua (dua) digit angka.
Lalu kirim ke 808 via SMS
Contoh: DATE 1 0301 060111299
Tarif :
Rp. 8.000,- / pilihan lagu (untuk original music)
Rp. 6.000,- / pilihan lagu (untuk sound effect)
(belum termasuk PPN 10%)

sumber: www.i-ring808.com


PANDUAN AKTIVASI Ring Back Tones
RBT 1818 - XL


Layanan ini dapat digunakan oleh seluruh pelanggan jempol, bebas, Xplor, dan jimat di seluruh area jaringan XL.

SMS ke 1818 Rp 350 (belum termasuk PPN)
Menu layanan data Rp 350 (belum termasuk PPN)
Telepon ke 1818 Rp 500/menit (belum termasuk PPN)
Biaya bulanan Rp 5.500/30 hari (belum termasuk PPN)
Content Rp 7.000/lagu/permintaan (belum termasuk PPN)

Catatan:
a.) Untuk pelanggan baru, gratis biaya bulanan untuk 1 bulan pertama.
b.) Anda akan dibebankan biaya bulanan secara otomatis setiap 30 hari
c.) Kami dapat mengganti content RBT Anda atau meminta Anda menggantinya, jika kontrak kami dengan pihak penyedia lagu berakhir.
d.) Seluruh content RBT dalam layanan ini disediakan oleh pihak penyedia lagu (Perusahaan Rekaman & Content Provider), dengan demikian content RBT akan tetap ada sepanjang disediakan oleh penyedia lagu.


Kirim SMS dengan pesan seperti di bawah ini, dan kirimkan ke 1818:

Default Song
Command Keyword Short Code
Untuk request lagu Song code 1818
Jika sudah berlangganan
Untuk request lagu Song code 1818
Jika belum berlangganan


Kirim SMS dengan pesan seperti di bawah ini, dan kirimkan ke 1818:

Default Song
Command Keyword Short Code
Untuk request lagu Song code 1818
Jika sudah berlangganan
Untuk request lagu Song code 1818
Jika belum berlangganan

Time of Day
Command Keyword Short Code
Untuk request feature time of day Pagi PagiWIB 1818
[song code]
Untuk request feature time of day Siang. SiangWIB 1818
[song code]
Untuk request feature time of day Sore SoreWIB 1818
[song code]
Untuk request feature time of day. KantorWIB 1818
[song code]
Untuk time of day PagiWIB 1818
[song code]
Jika belum berlangganan atau
SiangWIB
[song code]
Untuk melihat list lagu di feature time of day Listtime 1818
Note :
Pembagian waktu digunakan sesuai dengan daerahnya. Misal : WIB,WIT,WITA.

Caller ID
Command Keyword Short Code
Untuk mendaftarkan caller id C1[MSISDN][song code] 1818
Jika sudah berlangganan
Untuk mendaftarkan caller id C1[MSISDN][song code] 1818
Jika belum berlangganan
Untuk mendaftarkan caller id C1[MSISDN][song code] 1818

Jika sudah berlangganan dan memiliki 5 Caller ID terdaftar
Untuk mengetahui list lagu feature caller id berdasarkan no. Hp terdaftar ListcallerMSISDN 1818

Jika belum mempunyai layanan Caller ID
Untuk mengetahui list lagu feature caller id berdasarkan judul lagu terdaftar ListcallerTitle 1818
Jika belum mempunyai layanan Caller ID

Special Occasions
Command Keyword Code
Untuk melakukan setting periode Special Occasion untuk penelepon tertentu 081XXXXXX 1818
[dd/mm/yy], [dd/mm/yy] [song code]
Jika sudah berlangganan
Untuk melakukan setting periode Special Occasion untuk penelepon tertentu 081XXXXXX 1818
[dd/mm/yy], [dd/mm/yy][song code]
Jika belum berlangganan
Untuk melakukan setting 1 hari Special Occasion untuk penelepon tertetentu 081XXXXXX 1818
[ dd/mm/yy ][song code]
Jika sudah berlangganan
Untuk melakukan setting 1 hari Special Occasion untuk penelepon tertentu 081XXXXXX 1818
[ dd/mm/yy ][song code]
Jika belum berlangganan
Untuk melakukan setting periode Special Occasion untuk semua penelepon [ dd/mm/yy ],[ dd/mm/yy ][song code] 1818

Jika sudah berlangganan
Untuk melakukan setting periode Special Occasion untuk penelepon tertentu [ dd/mm/yy ],[ dd/mm/yy ][song code] 1818

Jika belum berlangganan
Untuk melakukan setting 1 hari Special Occasion untuk semua penelepon [ dd/mm/yy ] 1818
[song code]
Jika sudah berlangganan
Untuk melakukan setting 1 hari Special Occasion untuk penelepon tertentu [ dd/mm/yy ] 1818
[song code]
Jika belum berlangganan
Untuk mengetahui profil Special Occasion LISTOC 1818

Jika sudah berlangganan

Untuk mengetahui profil Special Occasion LISTOC 1818

Jika belum berlangganan

Delete Default Song
Command Keyword Short Code
Untuk delete Default Song DELDefault 1818
Jika sudah berlangganan
Untuk delete Default Song DELDefault 1818
Jika tidak mempunyai Default Song

Delete Jukebox
Command Keyword Short Code
Untuk delete Jukebox DELJUKE[song code] 1818
Jika sudah berlangganan
Untuk delete Jukebox DELJUKE[song code] 1818
Jika tidak mempunyai lagu tersebut dalam Jukebox.

Gift
Command Keyword Short Code
Mengaktifkan fitur Gift GIFT 1818
Hadiahkan lagu untuk B GIFT[nomor XL teman anda][song code] 1818
Untuk melihat list GiftBox LISTGIFT 1818
Untuk melihat bantuan Gift HELPGIFT 1818
Untuk melihat bantuan cara mengaktifkan Gift HELPGIFTSET 1818

Copy
Command Keyword Short Code
Copy lagu dari nomor tertentu COPY[No HP yang akan dicopy] 1818

Jika sudah berlangganan
Copy lagu dari nomor tertentu COPY[No HP yang akan dicopy] 1818

Jika belum berlangganan
Untuk melihat bantuan Copy HELPCOPY 1818

Delete Time of Day
Command Keyword Short Code
Untuk delete Time Of Day song DELTime 1818

Jika sudah berlangganan
Untuk delete Time Of Day song DELTime 1818

Jika tidak mempunyai Time Of Day song

Delete Caller ID
Command Keyword Short Code
Untuk delete Caller ID song DEL[C1/C2/C3/C4/C5] 1818

Jika sudah berlangganan
Untuk delete Caller ID song DEL[C1/C2/C3/C4/C5] 1818

Jika tidak mempunyai Caller ID song


Delete Special Occasion
Command Keyword Short Code
Untuk delete Special Occasion song DELOC 1818
Jika sudah berlangganan
Untuk delete Special Occasion song DELOC 1818

Jika tidak mempunyai Special Occasion song

Request What's New
Command Keyword Short Code
Untuk mengetahui list lagu – lagu terbaru (1-5) NEW 1818
Untuk mengetahui list lagu – lagu terbaru berikutnya NEW NEXT 1818

Request Top Download
Command Keyword Short Code
Untuk mengetahui Top Download list (1-5) TOP 1818
Untuk mengetahui Top Download list berikutnya TOP NEXT 1818

H e l p
Command Keyword Short Code
Untuk meminta bantuan HELP 1818
Untuk meminta bantuan tentang Time of Day HELPTIME 1818
Untuk meminta bantuan tentang Caller ID HELPCALLERID 1818
Untuk meminta bantuan tentang Special Occasion HELPOC 1818
Untuk meminta bantuan tentang Juke Box HELPJUKE 1818

Unsubscription
Command Keyword Short Code
Untuk menghentikan layanan UNSUB 1818
Jika sudah berlangganan
Untuk menghentikan layanan UNSUB 1818

Jika belum berlangganan


sumber: www.xl.co.id


PANDUAN AKTIVASI Ring Back Tones
FLEXITONE - TELKOMFLEXI


Untuk tarif layanan FlexiTONE masih tetap Rp. 8.000,- ( belum termasuk PPN 10 % )

Cara Registrasi & Aktivasi FlexiTONE :
1 Melalui IVR Hubungi nomor *1212
2 Melalui SMS Kirim ke 1212
3 Melalui WAP
4 Melalui Website


1. Mekanisme Aktivasi via IVR
Cara Registrasi & Aktivasi FlexiTONE melalui Telepon :
• Hubungi ke Nomor * 1212 dan ikuti petunjuk yang ada.
• IVR untuk shortcode : *1212 + 1 + RID.
• IVR untuk prelisten : 1812 + 2 + RID.
• IVR callback untuk mengaktifkan Gift : *1212 + 3 + RID + Seq_no.
Browser Anda mungkin tidak bisa menampilkan gambar ini.

2. Mekanisme Aktivasi via SMS
• Berlangganan :
Caranya mudah, cukup dengan mengirimkan SMS berisi pesan :
RINGSUB ke nomor 1212
RINGON ke nomor 1212
Browser Anda mungkin tidak bisa menampilkan gambar ini.


Browser Anda mungkin tidak bisa menampilkan gambar ini.


• Melihat TOP 5 FlexiTone favorit :


Caranya mudah, cukup dengan mengirimkan SMS berisi pesan :
RINGTOP5 ke nomor 1212
Browser Anda mungkin tidak bisa menampilkan gambar ini.


• Memperpanjang Masa Aktif :


Caranya mudah, cukup dengan mengirimkan SMS berisi pesan :
RINGRENEW ke nomor 1212
Browser Anda mungkin tidak bisa menampilkan gambar ini.


• Copy FlexiTONE :


Caranya mudah, cukup dengan mengirimkan SMS berisi pesan :
RINGCOPY ke nomor 1212

• Browser Anda mungkin tidak bisa menampilkan gambar ini.
Gift FlexiTONE :


Caranya mudah, cukup dengan mengirimkan SMS berisi pesan :


RINGGIFT ke nomor 1212
Browser Anda mungkin tidak bisa menampilkan gambar ini.


• List FlexiTONE :


Untuk mengetahui FlexiTone Id yang sedang aktif
Caranya mudah, cukup dengan mengirimkan SMS berisi pesan :
RINGLIST ke nomor 1212

• Browser Anda mungkin tidak bisa menampilkan gambar ini.
Help FlexiTONE :


Caranya mudah, cukup dengan mengirimkan SMS berisi pesan :


RINGHELP ke nomor 1212
Browser Anda mungkin tidak bisa menampilkan gambar ini.


• Berhenti Berlangganan :


Caranya mudah, cukup dengan mengirimkan SMS berisi pesan :
RINGOFF ke nomor 1212
Browser Anda mungkin tidak bisa menampilkan gambar ini.


• Special Day :


Untuk mengaktifkan special day (misalnya tanggal 9 Februari):
Ketik RINGSPECIALDDMMRBT_ID kirim ke 1212

• Browser Anda mungkin tidak bisa menampilkan gambar ini.
Time base :


Untuk mengaktifkan FlexiTONE berdasarkan waktu tertentu, misalnya berdasarkan jam atau hari:


Browser Anda mungkin tidak bisa menampilkan gambar ini.
Ketik RINGTIMETIME_IDRBT_ID kirim ke 1212


• Caller base :


Untuk mengaktifkan FlexiTONE berdasarkan pemanggil:
Ketik RINGCALLERMDNRBT_ID kirim ke 1212

• Group Base :
Untuk mengaktifkan FlexiTONE berdasarkan grup pemanggil. Sistem RBT membatasi maksimum 2 grup dengan masing-masing grup memiliki 3 MDN.
Ketik: RINGGROUP1/2MDN kirim ke 1212
Browser Anda mungkin tidak bisa menampilkan gambar ini.
• Random :
Jika pelanggan memiliki beberapa lagu di dalam tone box, maka pelanggan tersebut dapat mengaktifkan fitur random.
Browser Anda mungkin tidak bisa menampilkan gambar ini.
Ketik: RINGRANDOMON kirim ke 1212


3. Mekanisme Aktivasi via WAP
• Masuk kehalaman FlexiTONE ( Layanan ini dapat diakses menggunakan aplikasi WAP Browser 2.0 )
• Pilihlah lagu terfavorit anda


4. Mekanisme Aktivasi via WEB
• Kunjungi Website :http://flexiland.telkomflexi.com
• Registrasi User Id
• Masuk ke Page FlexiFun
• Masukan nomor Flexi Anda
• Masukkan nomor PIN & Password
• Anda langsung bisa memilih Lagu FlexiTONE Favorit Anda
*Coverage Area (Nasional)


sumber: www.telkomflexi.com


PANDUAN AKTIVASI Ring Back Tones
Nada Sambung - ESIA

Tarif Langganan

1. Akses DV8.88 : Rp. 750,- / menit

2. Nada Sambung :
Rp. 3.000,- + PPN / minggu
Rp. 9.000,- + PPN / bulan


Cara Mengaktifkan Nada Sambung Esia

1. Nada Sambung Esia dapat direquest melalui DV8.88 (Digital Voice 888) dengan cara : menelpon ke nomor 888 dari ESIA kamu, lalu katakan NADA SAMBUNG, lalu kemudian kamu dapat memilih kategori yang ada, dan setelah itu kamu dapat merequest lagu yang ada dengan menyebutkan judul lagunya.

2. Atau kamu bisa mengaktifkannya lewat SMS.
Cara ketik : RING(spasi)Kode Lagu
Kirim ke : 888

3. Untuk berhenti berlangganan, kirim SMS
Cara ketik : RING[spasi)UNSUB kirim ke 8888 (tarif SMS gratis)

Tarif Esia Minggu Bulan
SMS ke nomor 888 Rp 250 - -
Aktifasi 1 minggu - Rp. 3.000,- -
/7 hari
Aktifasi 1 bulan - - Rp 9.000,-
/30 hari


sumber: www.myesia.com


PANDUAN AKTIVASI Ring Back Tones
RingGo - MOBILE 8


Via SMS

Untuk mengaktifkan RingGo, kirim ke SMS ke 2525 dengan mengetik:

RINGGOSet(9 Digit kode lagu)
Contoh: Ringgoset123456789
Kirim ke : 2525

Periksa ponsel Anda dan baca SMS balasan dari 2525 berisi konfirmasi
Reply kembali ke 2525 dengan mengetik : Ya

Tarif untuk layanan RingGo :

Content : Rp. 9000,- per melodi per 30 hari + ppn
IVR: Rp. 500,- per menit
SMS: Rp. 250,- per pesan

Untuk berhenti berlangganan RingGo, kirim SMS ke 2525 dengan mengetik:

RINGGOHAPUS

Akan ada SMS dari 2525 ke ponsel Anda untuk konfirmasi
Reply kembali ke 2525 dengan mengetik : ya


Layanan RingGo
Kirim ke 2525

Lagu Terlaris
Ringgo Top

Lagu Terbaru
Ringgo New

Berhenti Berlanggan
Ringgo Hapus

Mengganti Lagu
Ringgo Set 9 Digit Kode lagu


Via IVR

Pengaturan RingGo
Telpon ke 2525 dari ponsel Fren atau Hepi Anda.
Tekan nomor 2.
Ikuti petunjuk yang diberikan.

Mencari Kode Lagu
Telpon ke 2525 dari ponsel Fren atau Hepi Anda
Tekan nomor 3.
Ikuti petunjuk yang diberikan

Mengirim RingGo ke Teman
Telpon ke 2147 dari nomor ponsel Fren atau Hepi Anda
Ikuti panduan IVR yang diberikan
Tekan 0 untuk memilih melodi.
Tekan 2 untuk mendengarkan kembali
Tekan 7 untuk memilih menu kirim hadiah.
Pulsa akan terpotong pada si pengirim hadiah.

Aktifkan Hadiah dari Teman
Telpon ke 2146 / 2147 (tergantung message yang Anda terima di handset) dari ponsel Fren atau Hepi Anda
Ikuti panduan IVR yang diberikan


sumber: www.mobile-8.com


PANDUAN AKTIVASI Ring Back Tones
Ring Back Tones - AXIS


SMS

Perintah-perintah lain yang dapat dikirimkan melalui SMS untuk layanan AXIS RBT :

Fitur Perintah Kirim Ke
Aktivasi AXIS RBT ON 333
Aktivasi + Download RBT ON[Kode RBT]
Deaktivasi AXIS RBT OFF
Penghapusan RBT OFF[Kode RBT]
Pengiriman RBT (Gift) GIFT[Kode RBT][Nomor AXIS tujuan]
Lihat daftar lagu dalam album MYLIST
Top N download TOP

IVR

Aktivasi + Download RBT
1. Lakukan panggilan ke 333 melalui nomor AXIS kamu.
2. Pilih jenis bahasa yang diinginkan. Jika kamu sudah terdaftar sebagai pelanggan AXIS RBT, lanjutkan ke langkah berikutnya. Jika belum terdaftar, tekan 1 dan kamu akan otomatis menjadi pelanggan AXIS RBT.
3. Tekan 1 untuk mendownload RBT pilihanmu.
4. Tekan 1/2/3 untuk pilihan daftar RBT yang tersedia, dan RBT akan diperdengarkan satu per satu.
5. Tekan 3 untuk mendownload RBT yang sedang kamu dengar.
6. Tekan 1 untuk konfirmasi pembelian.

sumber: www.axisworld.co.id
PANDUAN AKTIVASI Ring Back Tones
Ring Back THREE


Download via Handphone
ketik:
kirim ke 1212
contoh:
ketik SHOUTUL HAROKAH kirim ke 1212


Keterangan
Tarif Berlangganan RBT Rp.7,000 /30 hari
Tarif SMS ke 1212 dan ke 333 Rp.250
Langganan akan diperpanjangan otomatis setelah 30 hari
Semua tarif belum termasuk PPN 10% sudah termasuk GPRS
Untuk berhenti berlangganan, tekan *333*3# dan pilih lagu yang akan diberkan


PANDUAN AKTIVASI Ring Back Tones
Nada Sambung CERIA

Cara aktifasi nada sambung Ceria:
o Via SMS: ketik RING (spasi) ON (spasi) Kode lagu atau Alias, kirim SMS ke 234

Contoh:
o RING ON 3610101 dan kirim SMS ke 234 atau
o RING ON camel6 dan kirim SMS ke 234
o Via layanan interaktif: hub 234 dari telepon Ceria Anda dan ikuti petunjuk
o Via short code: tekan 234* lanjutkan Yes/OK dari telepon Ceria dan ikuti petunjuk

Cara mematikan nada sambung Ceria:
o Via SMS: ketik RING (spasi) OFF, kirim SMS ke 234
o Via layanan interaktif: hub 234 dari telepon Ceria Anda

Tarif berlangganan: Rp7.000/lagu/30 hari
Tarif berlangganan bulan berikutnya: Rp7.000/lagu/30 hari
Langganan akan diperpanjang otomatis selama 30 hari
Tarif aktifasi via SMS: Rp200/sms
Semua tarif belum termasuk pajak

Untuk info lebih lanjut hubungi 234 dari telepon Ceria Anda.

Setting Dial Up Internet menggunakan operator GSM dan CDMA

1. Telkomsel Flash – Halo/Simpati/As (Waktu)
Dial Up Number : *99***1#
User Name :
Password :
Access Point : FLASH
Extra Setting : at+cgdcont=1,”IP”,”flash”

2. Telkomsel GPRS – Halo/Simpati/As (Data)
Dial Up Number : *99***1#
User Name : wap
Password : wap123
Access Point : TELKOMSEL
Extra Setting : at+cgdcont=1,”IP”,”internet”

3. Indosat – Matrix – (Data)
Dial Up Number : *99***1#
User Name :
Password :
Access Point : www.satelindogprs.com
Extra Setting : at+cgdcont=1,”IP”,” www.satelindogprs.com”

4. Indosat – Mentari – (Data)
Dial Up Number : *99***1#
User Name : indosat
Password : indosat
Access Point : www.satelindogprs.com
Extra Setting : at+cgdcont=1,”IP”,” www.satelindogprs.com”

5. Indosat – IM3 – (Data)
Dial Up Number : *99***1#
User Name : gprs
Password : im3
Access Point : www.indosat-m3.net
Extra Setting : at+cgdcont=1,”IP”,” www.indosat-m3.net”

6. Indosat – IM3 – (Waktu)
Dial Up Number : *99***1#
User Name : indosat@durasi
Password : indosat@durasi
Access Point : www.indosat-m3.net
Extra Setting : at+cgdcont=1,”IP”,” www.indosat-m3.net”

7. XL – Xplor/Bebas/Jempol (Data)
Dial Up Number : *99***1#
User Name : xlgprs
Password : proxl
Access Point : www.xlgprs.net
Extra Setting : at+cgdcont=1,”IP”,” www.xlgprs.net”

8. Telkom Flexi – Classy/Trendy (Data)
Dial Up Number : #777
User Name : telkomnet@flexi
Password : telkom
Access Point :
Extra Setting : at+crm=1
9. Telkom Flexi – Classy/Trendy (Waktu)
Dial Up Number : 080989999
User Name : telkomnet@instan
Password : telkom
Access Point :
Extra Setting : at+crm=0

10. Mobile 8 – Fren
Dial Up Number : #777
User Name : m8
Password : m8
Access Point :
Extra Setting :

11. Starone
Dial Up Number : #777
User Name : starone
Password : indosat
Access Point :
Extra Setting :

12. Esia (Waktu)
Dial Up Number : #777
User Name : esia
Password : esia
Access Point :
Extra Setting :

Memulai Sebuah Blog

Ditulis Oleh nyebrut, Tuesday, 5 February 2008

Rekan – rekan semua , nama saya Aga member baru di Asian Brain, saya baru menginjak 2 bulan keanggotaan saya di Asian brain.

Saya ingin berbagi pengalaman dengan rekan – rekan mudah mudahan ada faedahnya, dan juga sebaliknya saya dapat memperoleh feedback informasi dari rekan2.

Pertama. saya bergabung dengan Asian Brain saya iseng2 bikin blog di http://www.blogger.com dengan nama seingatnya yang ada dalam pikiran saya.

Kedua.Setelah selesai membuat blog yang ala kadarnya .saya menambahkan aksesories blog dengan bergabung di situs http://www.doneeh.com , disana ada shoutbox,web counter, URL referrer, link manager, subcription.

Ketiga. RSS (RDF Site Summary) mencoba dengan http://feedburner

Keempat , mencoba memasarkan blog dengan http://blogrolling.com

Kelima . menggunakan Technorati, yang digunakan untuk mencari jutaan blog di internet berdasarkan topik.

Kelima. Melakukan submitting ke dalam search engine Google dengan menggunakan http://google.com/addurl/

Keenam. Buat alamat email anda di gmail.com yaitu di http://www.mail.com

Setelah itu saya daftar ke adsense untuk bisa login ……… nanti akan dapat notifikasi dari Google adsense … dan rekan rekan dapat login ….

Dan Saya lega Tahap Awal telah di lalui ….. Dan saya harus memikirkan tahap slanjutnya. Dengan mengikuti arahan dari dari ahira dan semua tutor yang mendukung .

Demikian pengalaman yang saya dapat sampaikan . untuk rekan2 . semua .. saya sangat bertrima kasih jika teman dapat berbagi pengalaman dengan saya..karna dengan berbagi pengalaman kita akan lebih bisa mengembangkan pemahaman tentang internet marketing.. dan untuk bu ahira dan semua rekan rekan di asian brain.. saya mengucapakan trima kasih atas segala perhatiannya….

Sukses S’lalu ASIAN BRAIN…dan semua Rekan-rekan yang ,semoga berhasil. !!!!

AGA

Nyebrut@yahoo.com.sg

Http://belajarmarket.blogspot.com

Membuat Toko Online ( bag 2 )

Nah akhirnya ketemu juga materi yang selanjutnya weheh

melanjutkan postingan yang sebelumnya

Ok kali ini saya ingin membahas bagaimana cara mengganti tampilan toko online kita, selain mengganti tampilan kita juga bisa mengganti bahasa dan juga mata uangnya agar sesuai dengan penjualan di indonesia itu kalau temen temen internet marketing indonesia pada mau jualan ke negara tercinta ini tetapi jika ingin jualan ke manca negara ya seperti ini perubahan bahasa ini tidak perlu di lakukan,
Ok langsung saja materi bagai manca cara mengganti template os commerce
Silahkan download template di sini kebetulan ada yang gratis ( tapi Cuma dikit ) weheh lha manaya juga gratis http://www.badeziner.com/2008/12/16/5-free-oscommerce-templates/
Silahkan download dan di extrak ( file ini di kompres menggunakan zip. Setelah selesai di extrak anda bisa lihat struktur template ini silahkan lihat di bawah ini

struktir file template oscomerce

File di atas berada dalam folder “catalog” dan yang perlu di garis bawahi, untuk mengganti template ini tidak seperti mengganti template wordpress atau blog lainnya, penggantian template oscomerce ini di lakukan sekali langsung jadi untuk satu template, jadi jika temen temen punya 10 template ya pastinya akan melakukan perubahasa sebanyak 10 kali. Selain melakukan perubahan tempate hanya sekali, untuk melakukan upload template ini juga tidak bileh sembaranga dan jangan melakukan upload sekali gus “kalau upload sekaligus saya jamin toko online anda eror ;)) “
Yang perlu anda upload cukup
1. Semua file dengan extensi .php dari nama file “account.php” sampai dengan “tell_a_friend.php”
Silahkan lihat gambar di bawah ini untuk lebih jelas

struktur2 Membuat Toko Online ( bag 2 )

upload1 Membuat Toko Online ( bag 2 )

2. setelah anda upload file file yang saya sebutkan, sekarang anda upload folder “images”

3. Sekarang masuk ke folder “includes” di dalam folder ini ada file yang tidak boleh untuk di upload file itu adalah “configure.php” database_tables.php” dan semua file di dalam folder “includes” silahkan di upload silahkan lihat gambar di bawah ini yang tidak di perkenankan untuk di upload

struktur3 Membuat Toko Online ( bag 2 )

upload-2-tinggalkan Membuat Toko Online ( bag 2 )
Yang perlu anda upload cukup 3 Folder yang saya sebutkan selebihnya anda bisa cuekin saja ;))
Ok jika sudah anda lakukan dengan benar sekarang anda bisa cek toko online anda pasti sudah berubah wujud. ini buktinya http://jogjatemplate.net/tokoonline/

Ok setelah anda sukses mengganti template sekarang anda harus bisa mengganti bahasa menjadi bahasa indonesia
Silahkan download plugin di link berikut http://addons.oscommerce.com/info/4758
Setelah anda download anda bisa extrak file downloadtan anda, dalam folder ini ada folder yang manaya “catalog” nah di dalam folder catalog ini ada 2 folder lagi, nah kita sekarang harus kerjakan di 2 folder, 1. Folder “admin” 2 folder “includes” nah kita uploadnya juga ndak boleh bareng karena kalau bareng pasti eror lagi weheh silahkan lihat gambar berikut untuk info lengkapnya

bahasa-struktur1 Membuat Toko Online ( bag 2 )

silahkan anda upload satu persatu, misalnya anda ingin melakukan upload untuk folder “includes” silahkan anda masuk ke folder “includes” setelah anda masuk maka anda akan menemukan 1 folder “indonesia” dan 1 file indonesia.pgp ok jika sudah anda bisa lakukan upload berikut gambarnya

upload3-bahasa Membuat Toko Online ( bag 2 )

sampai di sini paham kan ? nah silahkan upload juga untuk folder “admin” prosesnya sama

sika anda sudah selesai upload tugas anda belum selesai karena masih ada 1 folder yang anda harus ganti lagi ya itu folder “buttons” Yang berada di “includes/languages/indonesia/images” silahkan anda ganti dengan folder “buttons” dari template yang anda upload anda bisa mencarainya di “includes/languages/english/images”

ok jika anda sudah melakukan upload dan telah melakukan cara yang benar sekarng langkah selanjutnya anda masuk ke admin area domainanda.com/admin sekarng di dalam halaman admin anda bisa gantikan sesuai berikut

bahasa1 Membuat Toko Online ( bag 2 )

Silahkan pilih Localitation lalu languages, nah di sana defaultnya cuma ada 2 dan sekarang anda bisa menambahkan bahasa baru ya itu bahasa indonesia, silahkan klik new language lalu akan keluar halaman berikut

bahasa2 Membuat Toko Online ( bag 2 )

ok isikan sesuai dangan gambar di atas ” jika anda memasukan folder yang tadi sudah saya berikan petunjuknya benar anda cukup mengiskan isian sesuai dengan yang saya tulisakan di sana, ok jika sudah anda bisa klik Insert

ok jika ingin mengganti mana uang anda bisa ke menu ‘Currencies

Ok deh sepertinya sampai di sini dulu yah saudah jam setengah 4 pagi neh hehe udah nguantuk tak tidur dulu :D besok di lanjut lagi, mudah mudahan postingan ini bermanfaaat untuk semua

kalau temen temen pgn cepet bisa jangan cuma di baca tapi harus di praktikkan okeh tar kalau dah jadi jangan lupa PM saya biar aku bisa lihat hasil karyamu okeh …..

Hosting Murah

Jika temen temen mau copas artikel ini ke blog sampean silahkan saya ndak melarang tapi saya di beri 1 link yah ke blog http://nankment.com dengan anchor text internet marketing indonesia

Table Of Contents

Networking Concepts

WAN Technologies

ISDN

ISDN Components

Frame Relay

X.25

CHAP and PAP Authentication

CHAP Authentication

PAP Authentication

Access Lists

Dialer Interfaces and Dialer Profiles

Dialer Interfaces and Dialer Maps

Dialer Pools

Network Address Translation

Dynamic Host Configuration Protocol

Virtual LANs

VLAN Issues

LAN Segmentation

Security

Broadcast Control

Performance

Network Management

Communicating Between VLANs

VLAN Translation

Designing Switched VLANs


Networking Concepts


This appendix describes concepts that can help you in designing your network and in configuring your router in accordance with the examples in this guide.

This appendix contains the following sections:

WAN Technologies

CHAP and PAP Authentication

Access Lists

Dialer Interfaces and Dialer Profiles

Network Address Translation

Dynamic Host Configuration Protocol

Virtual LANs

WAN Technologies

This section describes some of the WAN connection types that can be used with Cisco 1700 series routers, such as ISDN, Frame Relay, and X.25.

ISDN

ISDN is a set of digital services that is available through your local telephone company. ISDN digitizes information that is sent over the telephone network so that voice, data, text, graphics, music, video, and other material can be sent over existing telephone wire.

ISDN Components

ISDN components include terminals, terminal adapters (TAs), network termination devices, line-termination equipment, and exchange-termination equipment.

ISDN Terminals

There are two type of ISDN terminals:

Terminal equipment type 1 (TE1) is designed specifically to work with ISDN. TE1s connect to the ISDN network with 4-wire, twisted-pair cable.

Terminal equipment type 2 (TE2) is non-ISDN equipment (such as data terminal equipment [DTE]) that predates ISDN standards. TE2s connect to the ISDN network with a terminal adapter.

ISDN Network Termination Devices

Two types of ISDN terminal devices can connect your router to the telephone company's conventional 2-wire local loop:

Network termination type 1 (NT1)—In North America, the NT1 is provided by the customer. In most other parts of the world, the NT1 is part of the network provided by the ISDN service provider. WAN interface cards that do not have an integrated NT1 must have an external NT1 in order to connect to ISDN services. The Cisco 1604 and ISDN BRI U WAN interface cards each have an integrated NT1.

Network termination type 2 (NT2)—This more complicated device is usually found in digital private branch exchanges (PBXs).

There is also an NT1/2 device available that can perform the functions of both an NT1 and an NT2.

Services

There are two types of ISDN services:

Basic Rate Interface (BRI)—This service provides two B channels and one D channel. Each B channel operates at 64 kbps and carries user data. The D channel operates at 16 kbps and carries control and signaling information, although in certain circumstances it carries user data. BRI supports framing control and overhead, and the total bit rate is 192 kbps.

Primary Rate Interface (PRI)—This service provides 23 B channels (which operate at 64 kbps) and 1 D channel (which operates at 64 kbps) in North America and Japan, resulting in a bit rate of 1.544 Mbps. In Europe, Australia, and other parts of the world, PRI provides 30 B channels, 1 D channel, and 1 maintenance/error channel. Each channel is 64 Kbps, for a total bit rate of 2.048 Mbps.

Sample Configuration

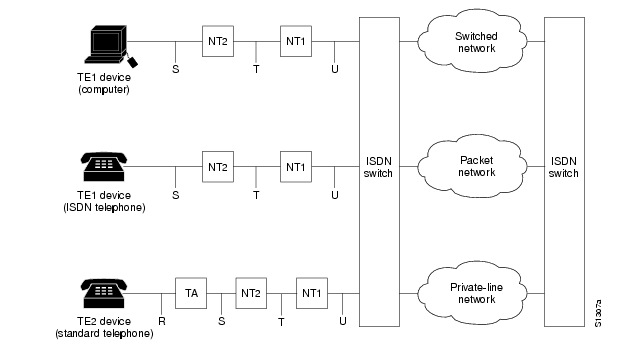
Figure 0-1 shows an example of ISDN configuration for various devices used to connect the user to the ISDN network.

Two of the devices shown, the computer and the ISDN telephone, are compatible with ISDN. The third device, the standard telephone, requires a TA to connect to the ISDN network through an NT1 or NT2 device.

Figure 0-1 Sample ISDN Network

Frame Relay

Frame Relay is a method of packet-switching that is used for communication between user devices (such as routers, bridges, and host machines) and network devices (such as switching nodes and modems). User devices are called data terminal equipment (DTE), and network devices are called data circuit-terminating equipment (DCE).

Frame Relay services can be provided by either a public network or a network of privately owned equipment serving a single enterprise.

Frame Relay is a streamlined, efficient, high-performance protocol. It is extremely fast because

It multiplexes many logical data conversations (or virtual circuits) over one physical link. Multiplexing provides flexible and efficient use of bandwidth.

It uses fiber media/digital transmission links. These types of physical connections have a high level of data integrity, so Frame Relay does not need to perform error checking. Error checking is time-consuming and can decrease WAN performance.

It does not need to perform flow control procedures because these types of procedures are done by upper-layer protocols. Frame Relay uses a simple congestion notification mechanism to inform user devices when the network become congested. Congestion notification alerts the higher-layer protocols that flow control is needed.

Current Frame Relay standards support permanent virtual circuits (PVCs) that are configured and managed in a Frame Relay network. The Cisco 1700 router supports switched virtual circuits (SVCs) for DTE interfaces.

Frame Relay also has Local Management Interface (LMI) extensions for supporting large, complex internetworks. Any LMI extension known as common should be implemented in internetworks that support the LMI specification. Other LMI extensions are known as optional.

The LMI extensions are as follows:

Virtual circuit status messages (common)—Provide communication and synchronization between the network and the user device, periodically report the addition of new PVCs and the deletion of existing PVCs, and provide information about PVC integrity.

Multicasting (optional)—Allows a sender to transmit a single frame to multiple recipients, supporting the efficient routing of protocol messages and address resolution procedures that typically must be sent to many destinations simultaneously.

Global addressing (optional)—Gives connection identifiers global rather than local significance, allowing them to be used to identify a specific interface to the Frame Relay network. Global addressing makes the Frame Relay network resemble a LAN, with respect to addressing.

X.25

X.25 is a method of packet switching that is used for communication between user devices (such as routers, bridges, and host machines) and network devices (such as switching nodes and modems). User devices are called data terminal equipment (DTE), and network devices are called data circuit-terminating equipment (DCE).

With X.25, one computer calls another to request a communication session. The called computer can accept or refuse the connection. If the call is accepted, the two computers begin full-duplex information transfer. Either computer can terminate the connection at any time.

User devices communicate with a bidirectional association called a virtual circuit. Devices on a network use virtual circuits to communicate through intermediate nodes without being directly, physically connected to each other. Virtual circuits are permanent or switched (temporary). PVCs are typically used for the most-often-used data transfers, and SVCs are used for sporadic data transfers.

BRI is an ISDN interface consisting of two B channels (B1 and B2) and one D channel. The B channels are used to transfer data, voice, and video. The D channel carries signal and call setup information. IPX, AppleTalk, transparent bridging, Xerox Network Systems (XNS), DECnet, and IP can all be encapsulated as X.25 over the ISDN B channels.

ISDN uses the D channel to carry signal information. ISDN can also use the D channel in a BRI to carry X.25 packets. The D channel has a capacity of 16 kbps; the X.25 over D channel can use up to 9.6 kbps.

You can set the parameters of the X.25-over-D-channel interface without disrupting the original ISDN interface configuration. In a normal ISDN BRI interface, the D and B channels are bundled together and represented as a single interface. The original BRI interface continues to represent the D, B1, and B2 channels.

Because some end-user equipment uses static terminal endpoint identifiers (TEIs) to access this feature, X.25 supports static TEIs. The dialer recognizes the X.25-over-D-channel calls and initiates them on a new interface.

X.25 traffic over the D channel can be used as a primary interface when low-volume, sporadic interactive traffic is the normal mode of operation. Supported traffic includes IP, IPX, AppleTalk, and transparent bridging.

CHAP and PAP Authentication

In configuring your router, you must select a method of authentication. Authentication is used for security and for identifying who is calling in so that the called router can correctly forward packets to the correct interface. This is generally required when dialer rotary groups are used and multiple sites are calling into a single router.

The configuration examples in this guide use Point-to-Point Protocol (PPP) with Challenge Handshake Authentication Protocol (CHAP) or Password Authentication Protocol (PAP) for security and authentication. CHAP and PAP, when used with PPP encapsulation, allow routers to authenticate incoming calls.

CHAP Authentication

With CHAP, a remote device attempting to connect to the local router is requested, or challenged, to respond. When the local router receives the challenge response, it verifies the response by looking up the name of the remote device given in the response. The passwords must be identical on the remote device and the local router. The names and passwords are configured using the username command.

In the following example, Router Macbeth allows Router Macduff to call in using the password "bubble":

hostname Macbeth
username Macduff password bubble
!
encapsulation ppp
ppp authentication chap

In the following example, Router Macduff allows Router Macbeth to call in using the password "bubble":

hostname Macduff
username Macbeth password bubble
!
encapsulation ppp
ppp authentication chap

PAP Authentication

Like CHAP, PAP is an authentication protocol used with PPP. However, PAP is less secure. CHAP passes an encrypted version of the password on the physical link, but PAP passes the password and host name or username in clear text.

When interactive mode (rather than dedicated mode) is used on asynchronous lines, the username command allows a router to verify a username in an internal database before the user can call in to the router. In the following example, user Joe Smith is allowed to call in to the router if he uses the password "freedom":

username JoeSmith password freedom
line 1
login

Access Lists

Access lists control packet filtering on Cisco routers by limiting traffic and restricting network use by certain users or devices. Although there are several purposes for using access lists, the configuration examples in this guide use access lists to control the transmission of packets on a specific interface.

An access list is a sequential collection of "permit" and "deny" conditions that apply to network addresses. Packet addresses are compared to the conditions in all access lists configured in the router. The first match determines whether the packet is accepted or denied by the router. Because the router stops testing conditions after the first match, the order in which the conditions are defined in the access list is critical. If a packet does not match any conditions configured in an access list, the router rejects the packet.

For detailed information on how access lists work and how to configure them, refer to the "Configuring IP Services" chapter in the Network Protocols Configuration Guide, Part 1, publication, which is available on the Documentation CD-ROM that came with your router.

Dialer Interfaces and Dialer Profiles

A dialer interface is a WAN interface on the router that is not continuously connected to a remote device; it dials the remote device whenever a connection is required. Configuring an interface on a Cisco router to dial a specific remote device at specific times requires configuring dialer profiles.

You can use dialer profiles to configure the router's physical interfaces separately from the logical configuration required for a call. You can also configure the router to allow the logical and physical configurations to be dynamically bound together on a per-call basis. All calls going to or from the same destination subnetwork use the same dialer profile.

A dialer profile consists of the following elements:

A dialer interface (a logical entity) configuration with one or more dial strings, each used to reach a specific destination subnetwork.

A dialer map class defining all the characteristics for any call to the specified dial string (telephone number).

An dialer pool of physical interfaces to be used by the dialer interface. The physical interfaces in a dialer pool are ordered according to priority.

Dialer Interfaces and Dialer Maps

A dialer interface configuration is a group of settings the routers uses to connect to a remote network. One dialer interface can use multiple dial strings (telephone numbers). Each dial string is associated with its own dialer map class. The dialer map class defines all the characteristics for any call to the specified dial string. For example, the dialer map class for one destination might specify a 56-kbps ISDN speed, and the map class for a different destination might specify a 64-kbps ISDN speed.

Dialer Pools

Each dialer interface uses one group of physical interfaces, called a dialer pool. The physical interfaces in a dialer pool are ordered based on priority. One physical interface can belong to multiple dialer pools. ISDN BRI interfaces can set a limit on the minimum and maximum number of B channels reserved by any dialer pool. A channel reserved by a dialer pool remains idle until traffic is directed to the pool.

When you use dialer profiles to configure dial-on-demand routing (DDR), the physical interface is configured only for encapsulation and for the dialer pools to which the interface belongs. All other characteristics used for making calls are defined in the dialer map.

Network Address Translation

Network Address Translation (NAT) provides a mechanism for a privately addressed network to access registered networks, such as the Internet, without requiring a registered subnet address. This mechanism eliminates the need for host renumbering and allows the same IP address range to be used in multiple intranets.

NAT is configured on the router at the border of an inside network (a network that uses nonregistered IP addresses) and an outside network (a network that uses a globally unique IP address; in this case, the Internet). NAT translates the inside local addresses (the nonregistered IP addresses assigned to hosts on the inside network) into globally unique IP addresses before sending packets to the outside network.

With NAT, the inside network continues to use its existing private or obsolete addresses. These addresses are converted into legal addresses before packets are forwarded onto the outside network. The translation function is compatible with standard routing; the feature is required only on the router connecting the inside network to the outside domain.

Translations can be static or dynamic. A static address translation establishes a one-to-one mapping between the inside network and the outside domain. Dynamic address translations are defined by describing the local addresses to be translated and the pool of addresses from which to allocate outside addresses. Allocation occurs in numerical order, and multiple pools of contiguous address blocks can be defined.

NAT eliminates the need to readdress all hosts that require external access, saving time and money. It also conserves addresses through application port-level multiplexing. With NAT, internal hosts can share a single registered IP address for all external communications. In this type of configuration, relatively few external addresses are required to support many internal hosts, thus conserving IP addresses.

Because the addressing scheme on the inside network may conflict with registered addresses already assigned within the Internet, NAT can support a separate address pool for overlapping networks and translate the addresses as appropriate.

Dynamic Host Configuration Protocol

Dynamic Host Configuration Protocol (DHCP) is a client-server protocol that enables devices on an IP network (the DHCP clients) to request configuration information from a DHCP server. DHCP allocates network addresses from a central pool on an as-needed basis. DHCP is useful for assigning IP addresses to hosts connected to the network temporarily or for sharing a limited pool of IP addresses among a group of hosts that do not need permanent IP addresses.

DHCP frees you from having to manually assign an IP address to each client.

DHCP configures the router to forward User Datagram Protocol (UDP) broadcasts, including IP address requests, from DHCP clients. DHCP allows for increased automation and fewer network administration problems by

Eliminating the need for the manual configuration of individual computers, printers, and shared file systems

Preventing the simultaneous use of the same IP address by two clients

Allowing configuration from a central site

Virtual LANs

A virtual LAN (VLAN) is a switched network that is logically segmented on an organizational basis, by functions, project teams, or applications, rather than on a physical or geographical basis. For example, all workstations and servers used by a particular workgroup team can be connected to the same VLAN, regardless of their physical connections to the network or the fact that they might be intermingled with other workgroup teams. Reconfiguration of the network can be done by means of software rather than by physically unplugging and moving devices or wires.

A VLAN can be thought of as a broadcast domain that exists within a defined set of switches. A VLAN consists of a number of end systems, either hosts or network equipment (such as bridges and routers), connected by a single bridging domain. The bridging domain is supported on various pieces of network equipment; for example, LAN switches that operate bridging protocols between them, with a separate bridge group for each VLAN.

VLAN Issues

VLANs are created to provide the segmentation services traditionally provided by routers in LAN configurations. VLANs address scalability, security, and network management. Routers in VLAN topologies provide broadcast filtering, security, address summarization, and traffic flow management. None of the switches within the defined group will bridge any frames, not even broadcast frames, between two VLANs. Several key issues need to be considered in designing and building switched LAN internetworks:

LAN Segmentation

Security

Broadcast Control

Performance

Network Management

LAN Segmentation

VLANs allow logical network topologies to overlay the physical switched infrastructure in such a way that any arbitrary collection of LAN ports can be combined into an autonomous user group or community of interest. The technology logically segments the network into separate Layer 2 broadcast domains whereby packets are switched between ports designated to be within the same VLAN. By restricting traffic originating on a particular LAN only to other LANs in the same VLAN, switched virtual networks avoid wasting bandwidth, a drawback inherent to traditional bridged and switched networks in which packets are often forwarded to LANs with no need for them. Implementation of VLANs also improves scalability, particularly in LAN environments that support broadcast- or multicast-intensive protocols and applications that flood packets throughout the network.

Security

VLANs also improve security by isolating groups. High-security users can be grouped into a VLAN, possibly on the same physical segment, and no users outside that VLAN can communicate with them.

Broadcast Control

Just as switches isolate collision domains for attached hosts and forward only appropriate traffic out a particular port, VLANs provide complete isolation between VLANs. A VLAN is a bridging domain and all broadcast and multicast traffic is contained within it.

Performance

The logical grouping of users allows an accounting group to make intensive use of a networked accounting system assigned to a VLAN that contains just that accounting group and its servers. That group's work will not affect other users. The VLAN configuration improves general network performance by not slowing down other users sharing the network.

Network Management

The logical grouping of users allows easier network management. It is not necessary to pull cables to move a user from one network to another. Additions, moves, and changes are achieved by configuring a port into the appropriate VLAN.

Communicating Between VLANs

The Cisco 1700 series routers uses the IEEE 802.1Q protocol for routing between VLANs.

The IEEE 802.1Q protocol is used to interconnect multiple switches and routers and for defining VLAN topologies. IEEE 802.1Q support is currently available only for Fast Ethernet interfaces.

Procedures for configuring routing between VLANs with IEEE 802.1Q encapsulation are provided in Chapter 4, "Configuring Routing Among VLANs with IEEE 802.1Q Encapsulation."

VLAN Translation

VLAN translation refers to the ability of the Cisco IOS software to translate between different virtual LANs or between VLAN and non-VLAN encapsulating interfaces at Layer 2. Translation is typically used for selective inter-VLAN switching of non-routable protocols and for extending a single VLAN topology across hybrid switching environments. Translation also allows the bridging of VLANs on the main interface; the VLAN encapsulating header is preserved. Topology changes in one VLAN domain do not affect a different VLAN.

Designing Switched VLANs

By the time you are ready to configure routing between VLANs, you will already have defined them through the switches in your network. Issues related to network design and VLAN definition should be addressed during your network design. Refer to the Cisco Internetworking Design Guide and appropriate switch documentation for information on these topics:

Sharing resources among VLANs

Load balancing

Redundant links

Addressing

Segmenting networks with VLANs

Segmenting the network into broadcast groups improves network security. Use router access lists based on station addresses, application types, and protocol types.

Routers and their role in switched networks

In switched networks, routers perform broadcast management, route processing and distribution, and provide communications among VLANs. Routers provide VLAN access to shared resources and connection to other parts of the network that are either logically segmented by means of the more traditional subnet approach or that require access to remote sites across wide-area links.

    About Me

    Dasar Pemikiran “Dan hendaklah diantara kamu ada segolongan yang menyeru kepada kebajikan, menyuruh berbuat yang ma’ruf, dan mencegah dari yang munkar. Dan mereka itulah orang-orang yang beruntung.” (QS. Ali Imran : 104) “Kamu (umat Islam) adalah umat terbaik yang dilahirkan untuk manusia, (karena kamu) menyuruh (berbuat) yang ma’ruf, dan menegah dari yang munkar. Dan mereka itulah orang-orang yang beruntung.” (QS. Ali Imran : 110) “Dan (ingatlah) ketika suatu umat berkata, “mengapa kamu menasihati kaum yang Allah akan membinasakan mereka atau mengazab mereka dengan azab yang amat keras?” mereka menjawab, “Agar kami mempunyai alasan (pelepas tanggung jawab) kepada Rabb-mu, dan suapya mereka bertakwa.” (QS. Al A’raf : 164)

    Followers